We may earn a commission if you make a purchase through the links on our website.
Host sFlow Beginner’s Guide

UPDATED: May 20, 2024
In this Host sFlow Beginner’s Guide, we will walk you through the core concepts of Host sFlow. What is it? How does it work? What’s its goal? And what are its strengths and limitations? In the later sections, we will go through the Host sFlow requirements, download, installation, and configuration process. In the last section, we will mention a few tools that can be used along the Host sFlow collector.
Table of Contents
- Introduction to Host sFlow
- What is the sFlow protocol?
- What problem does Host sFlow solve?
- Host sFlow’s Strengths and Limitations
- Strengths
- Limitations
- Before you start with Host sFlow
- Requirements
- Why is DNS-SD vital for Host sFlow?
- What does DNS-SD have to do with Host sFlow?
- How to configure DNS-SD for Host sFlow?
- How to start with Host sFlow?
- Download Host sFlow
- How to install Host sFlow on Windows?
- How to change the initial configuration later on?
- How to configure Host sFlow on a Linux server?
- How to integrate Host sFlow with sFlow collectors?
- Integrating a sFlow collector
- Software that can be used with Host sFlow
1. Introduction to Host sFlow
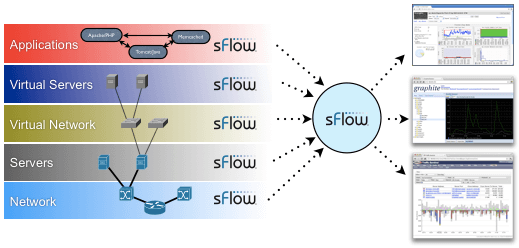
Host sFlow is free and open-source software that uses the sFlow protocol to export virtual or physical server performance. Host sFlow is implemented using the agent, host-sflow, which can be installed in many different systems, including all popular operating systems, servers, containers, hypervisors, and even switches. This agent collects performance metrics from applications, virtual, hardware, or entire networks. It then exports these metrics (using the sFlow standard) to a network management software supporting sFlow.
a. What is the sFlow protocol?
The sFlow (sampled flow) is an industry network standard created by InMon Corporation and used for sampling and exporting packets. It samples random individual packets based on a defined sampling rate. sFlow captures the entire packet header, so by default, it has complete visibility into traffic from Layers 2-7 (of the OSI model).
sFlow allows network and systems admins to understand their multi-vendor environment’s performance by collecting statistics, infrastructure, routing, and other types of data about traffic crossing a sFlow-enabled device.
A sFlow network is generally composed of the following elements:
- sFlow Agents [Exporters] The sFlow exporter is any device (hardware or virtual) that supports the sFlow standard; this includes most modern networking equipment from vendors like Cisco, Brocade, Juniper, and Arista. A sFlow exporter can also be a probe or host running with software such as the Host sFlow agent. Once a sFlow exporter samples a flow, it generates UDP flow records and sends them to a collector.
- sFlow Collectors A collector is a sFlow component that centralizes sFlow. It receives sFlow record packets from the sFlow exporters, pre-processes, and stores them. There is a wide variety of network management software capable of collecting sFlow data.
- sFlow Analyzer An sFlow analyzer is any software that supports sFlow and is designed for network performance monitoring, troubleshooting, or capacity planning. The sFlow analyzer can process, graph, and display sFlow collected data.
b. What problem does Host sFlow solve?
Although most networking vendors integrate the sFlow protocol into their products, not all host providers (servers, computers, or other networking equipment) do so. So, the Host sFlow solution through the host-sflow agent helps extend the visibility of hosts in a sFlow-enabled network.
The sFlow data provided by Host sFlow can help generate a complete picture of performance from any environment. The Host sFlow agent exports the performance data from various multi-vendor hosts, which can be combined with the network performance data provided by the network switches. In addition, since Host sFlow provides this centralized point for multi-vendor network and systems monitoring, it also helps reduce the number of tools required for an end-to-end view of the entire environment’s performance.
2. Host sFlow’s Strengths and Limitations
Although the sFlow is an excellent networking standard for sampling and exporting network traffic flows, it does have some limitations. In this section, we will go through the strengths and limitations of using Host sFlow software as a sFlow exporter.
a. Strengths
- Multi-vendor and multi-OS support One of the most significant strengths of Host sFlow is that it is supported by a wide range of systems from different vendors, including all popular operating systems, Linux containers, hypervisors, and switches. sFlow-enabled devices are the best choice in multi-protocol network environments.
- Highly scalable The sFlow standard was designed explicitly for scalable network visibility and control. Hundreds to thousands of sFlow-enabled exporters could send their ‘sampled’ metrics to a collector and network analyzer software for continuous monitoring.
- Minimal impact sFlow has minimal resource (such as CPU and memory) utilization on the devices being monitored, as it only performs packet sampling. sFlow does not need to fully identify and keep track of all sessions (as is the case of NetFlow). So, the Host sFlow agent generally provides performance monitoring with a very low impact on the systems being monitored.
b. Limitations
- sFlow does not provide packet-level details for complete and accurate network analysis sFlow does not track stateful flows; it simply collects a statistical sampling of individual packet headers. Although this is not necessarily a disadvantage, it can be a limitation if you are looking for the best network traffic and accountability precision.
- Sampling network traffic is not ideal for deep network security analysis Sampling network flows (or server performance by Host sFlow) will not provide the maximum visibility required for the best network security. Although sampling reduces resource impact, it can miss more profound hacker activities like commands and controls.
- sFlow does not support unsampled mode and cannot timestamp traffic flows If sampled packets are forwarded but not timestamped, there is always a degree of uncertainty about the exact time of packet capture. This is, again, not good for security or deep performance monitoring.
3. Before you start with Host sFlow
Now, you know that to monitor an environment with sFlow, you’ll need exporters, collectors, and analyzers. Before you start installing Host sFlow, you’ll need to set up the network. Below are a couple of crucial requirements.
a. Requirements
- sFlow collector’s IP Have the IP address (IPv4 or IPv6) of the sFlow collector ready. It can be local or remote. And you can technically define multiple collectors.
- sFlow agent’s IP The sFlow agent needs an IP address to identify itself on a network.
- DNS-SD By default, Host sFlow will use DNS-SD (DNS Server Discovery) to attempt to configure agents automatically (more on DNS-SD in the next section).
- Sampling rate and polling intervals You can define these parameters in the initial configuration via the DNS-SD or leave them as default.
b. Why is DNS-SD vital for Host sFlow?
Knowing what DNS-SD is and what it does for Host sFlow is vital for the configuration of agents in larger environments. The DNS-SD (DNS Server Discovery) is a method that uses DNS for server discovery and configuration information distribution. DNS-SD allows admins to manage configuration centrally and also distribute it to any server or host on a network using the standard DNS protocol.
c. What does DNS-SD have to do with Host sFlow?
If the Host sFlow agent is a DNS-SD client, it will not look for a specific IP or hostname (as it would in the standard DNS query); it will rather attempt to find services. DNS-SD informs the client that it should check the DNS zone file for any advertised services. So you can use DNS-SD to advertise these services and push configuration to Host sFlow agents. The DNS-SD will point the agent to a sFlow collector and will also set parameters like polling or sampling.
d. How to configure DNS-SD for Host sFlow?
If there is a DNS server in your network, and you would like to add the DNS-SD feature, you would need to configure the PTR records on a site’s DNS zone file.
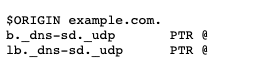
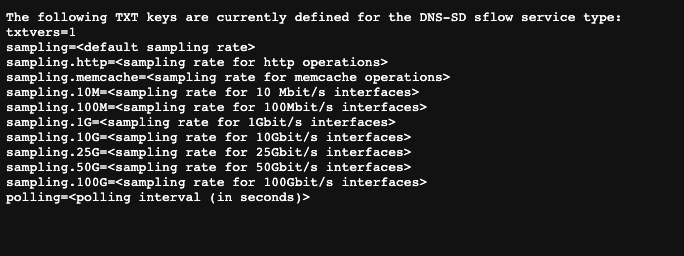
You can add PTR records on the DNS host file with Host sFlow settings such as sFlow collector IP or hostname and sampling or polling. Below is an example of the TXT record lines for configuring sampling and polling. Additionally, you’ll also need to configure the SRV record to point the Host sFlow exporter to its sFlow collector (such as Graphite or SolarWinds).
Keep in mind that you can also turn this off and manually set these parameters every time you need to add a new sFlow agent.
4. How to start with Host sFlow?
In this Host sFlow Beginner’s Guide, we will walk you through the process of downloading, installing, and configuring Host sFlow. To illustrate this process, we will install the agent on a Windows Server-2022 virtual instance and then install it on a Debian Linux virtual instance.
a. Download Host sFlow
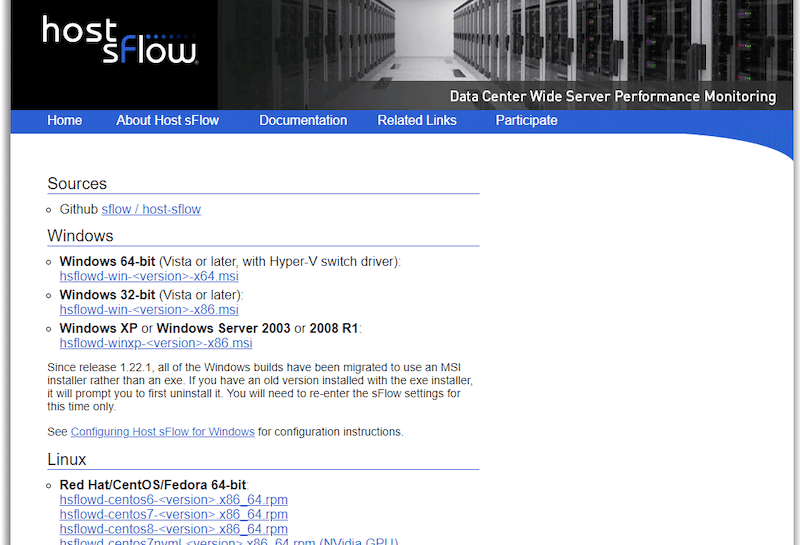
The best way to download Host sFlow is from its official website.
- Click on the “Download Now” button to see the download options.
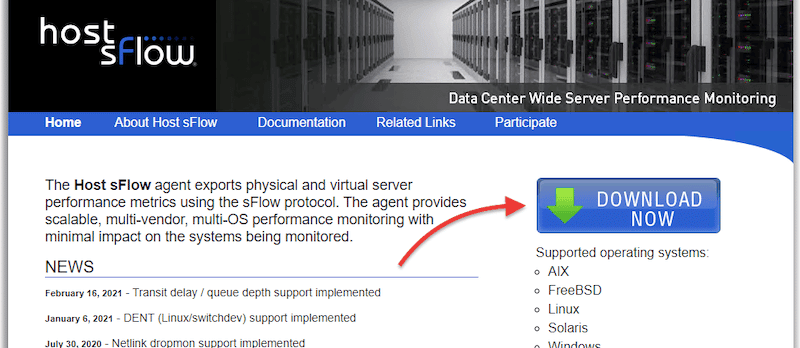
- The Host sFlow downloads page will show you multiple options for download. The Host sFlow website offers software versions for Windows 32-bit or 64-bit, Windows XP, or Server 2003 or 2008 R1. Host sFlow can be installed in the following Linux distributions: Red Hat, CentOS, and Fedora 64-bit.
- For Windows users: Keep in mind that when you install the Windows version, you’ll be using the MSI installer (and not the EXE).
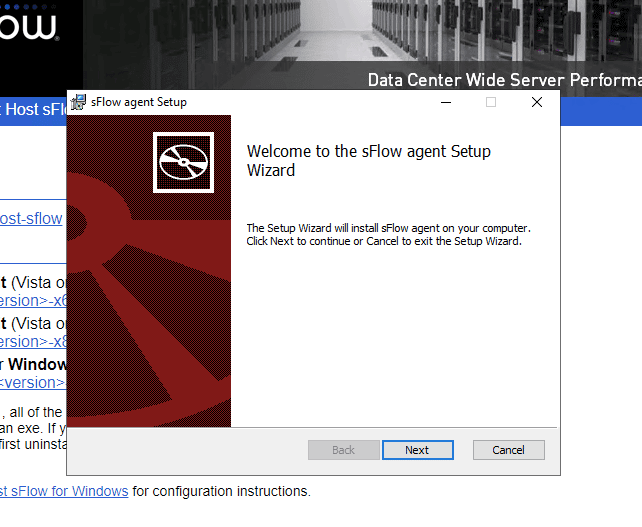
b. How to install Host sFlow on Windows?
- The installation process is pretty straightforward; To install Host sFlow follow the Setup Wizard.
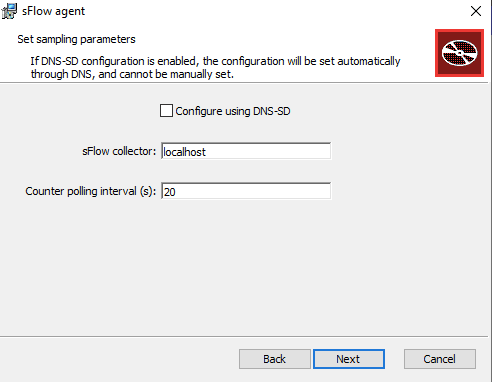
- The next installation window, “sFlow agent – set sampling parameters,” will prompt you whether you want to configure sFlow using the DNS-SD. As you learned in the section (Why is DNS-SD vital for Host sFlow?), if you enable “Configure using DNS-SD”, the sFlow configuration will be set automatically through DNS services. But keep in mind that you’ll need to have the DNS server host file already configured.

- To keep our Host sFlow beginner’s guide as simple as possible, we will not use the DNS-SD and configure our sFlow agent manually. We will use a sFlow collector deployed on the same machine, leaving the ‘localhost’ default value.
- After this, you will be ready to install the sFlow agent. Click on Finish and exit the installation wizard.
- Now, let’s check whether the Host sFlow service is up and running. To do this, open your Services Manager.
- Open “Run” on the Windows Menu and type services.msc. Click on open.
- Look for the service “Host sFlow Agent” and make sure whether its status is “Running”.
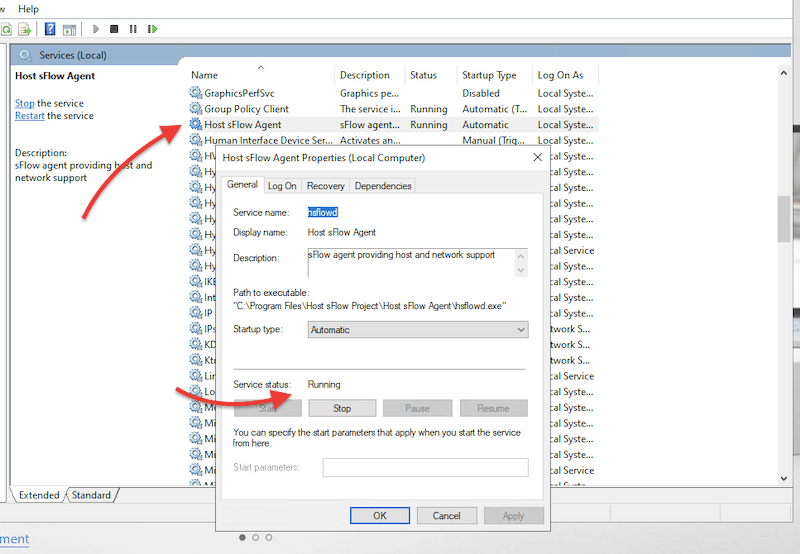
- Once the Host sFlow service is up and running, it will start sending telemetry data to the sFlow collector.
c. How to change the initial configuration later on?
If you change your mind later on, on whether to use or not to use DNS-SD, you can still change this configuration. If you are using the following Host sFlow Windows versions “hsflowd-win-<version>-x64.msi” or “hsflowd-win-<version>-x86.msi,” you’ll be able to change this configuration after installation. To do this, you’ll need to change the registry settings in (HKLM\SYSTEM\CurrentControlSet\Services\hsflowd\Parameters) and then restart the host sFlow service.
As shown in the screenshot below, you can still change the DNSSD value to “on”. You can also assign an IP address to the collector and define the polling interval and sampling rate.

d. How to configure Host sFlow on a Linux server?
When it comes to Linux, Host sFlow can be installed on Red Hat, CentOS, or Fedora (64-bits). It can also be installed on Debian or Ubuntu (64-bit). To illustrate the installation process for the Host sFlow on Linux, we will use a Debian server.
For a Debian/Ubuntu server, follow the next step-by-step guide:
- Update your system Start by updating the Linux (Debian) repository using the following command:
$ sudo apt-get update
- Download the package To start with Host sFlow on Linux, go and find the latest (stable) Host sFlow version on the Host sFlow download page. You can also check the latest version on the GitHub Host sFlow package repository. Now, let’s download the package with the following command:
$ sudo wget https://github.com/sflow/host-sflow/releases/download/v2.0.25-3/hsflowd-ubuntu18_2.0.25-3_amd64.deb
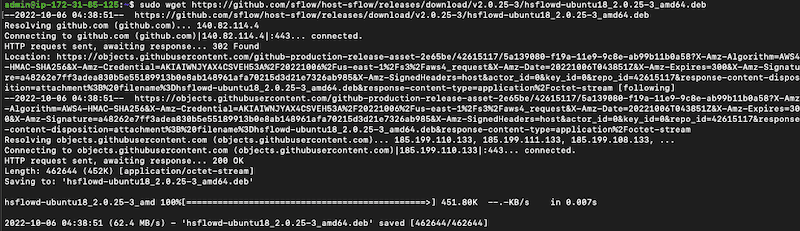
- Install the package Now that you have downloaded the package, go ahead and install it. Use the following command:
$ sudo dpkg -i hsflowd-ubuntu18_2.0.25-3_amd64.deb

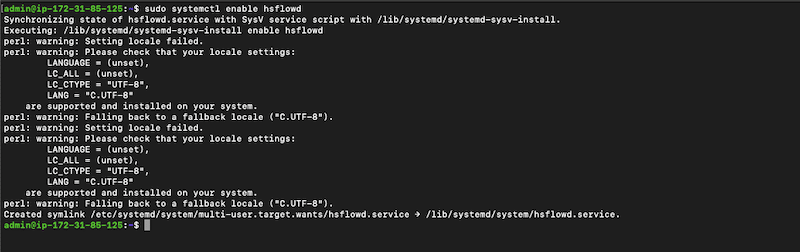
- Enable Host sFlow Now let’s enable the Host sFlow services. Use the following command:
$ sudo systemctl enable hsflowd
- Configure Host sFlow on Linux If you can’t modify the DNS-SD on your DNS servers or would rather manually edit the configuration on your client, then follow these next steps.
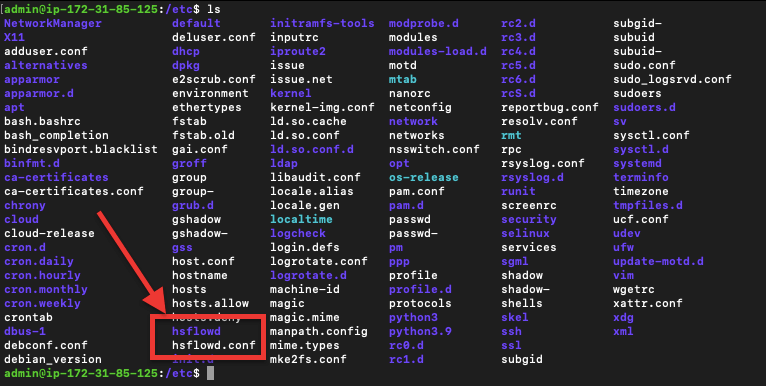
- The configuration is in /etc/hsflowd.conf. Find the hsflowd directory and then the hsflowd.conf file under /etc folder. Use a text editor to configure the hsflowd.conf file.
- Let’s configure the hsflowd.conf file. Access this file using your favorite text editor.
$ sudo vi hsflowd.conf
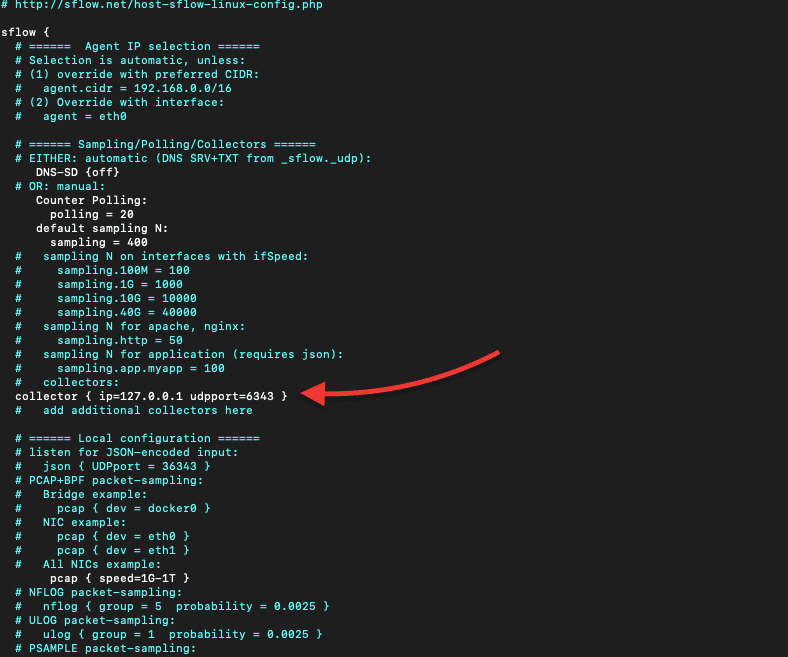
- From the hsflowd.conf, you’ll be able to change the agent IP, sampling, polling, and collector IP. As you might notice, right now, our agent is pointing to the localhost:6346 (127.0.0.1 and UDP port: 6343). To change default values, remove the comments (#) and change the configuration.
- First, change the line DNS-SD to off If this value is not off, it will ignore the rest of the configuration.
DNS-SD = {off}
- The following configuration is an example The commands will send sFlow to a collector on a local machine (but you can also set the IP of a remote collector). In addition, these commands also enable packet sampling on the 1G-1T speed range of network adapters, add the TCP information, and export metrics for Linux.
- sflow {
- packetSamplingRate=400
- counterPollingInterval=20
- collector { ip=127.0.0.1
- udpport=6343}
- pcap { speed=1G-1T }
- tcp { }
- systemd { }
- }
- Now, let’s ensure the Host sFlow service is on and running. Use the following command:
$ sudo systemctl status hsflowd

- If the service is inactive or down, use the following command to restart the service (or below to start it):
$ sudo systemctl restart hsflowd
$ sudo service hsflowd start
- Once the Host sFlow service is up and running, it will start sending telemetry to the sFlow collector.
5. How to integrate Host sFlow with sFlow collectors?
Now, the Host sFlow exporter [agent] configured in our Windows Server or Debian should be collecting and exporting performance metrics. But where can you see those metrics? And what can you do with that data?
As you learned in the first sections of this beginner’s guide, the sFlow Collector can be any network management or monitoring server that gathers sFlow data. According to the Host sFlow website, the sFlow collectors will collect data from sFlow-able devices and display and process different subsets of the available sFlow data. sFlow collectors can range from popular network management software such as Cisco’s Stealthwatch Enterprise, WhatsUpGold: Network Traffic Monitor, Inmon sFlow-RT, ManageEngine NetFlow Analyzer, PRTG Network Monitor, SolarWinds NetFlow Traffic Analyzer, Wireshark, and many more.
a. Integrating a sFlow collector
Configuring the sFlow collector is outside the scope of this Host sFlow beginner’s guide. In our previous examples, we left the collector with the local host IP. So, if we configured a collector on the same machine, it would start receiving the telemetry via the sFlow protocol.
In the next section, we will show a couple of sFlow tools that can work with Host Flow or be used as an alternative.
6. Software that can be used with Host sFlow
Below are some leading sFlow tools that can be used with Host sFlow.
- SolarWinds NetFlow Traffic Analyzer – FREE TRIAL NTA is a real-time network usage monitoring, flow analyzer, and bandwidth monitoring tool. It comes with a sFlow Collector that takes sFlow data and can help admins identify top talkers and bandwidth consumers and dig deep into the source of issues. Start a 30-day free trial.
- sFlow-RT by Inmon A sFlow analytics engine that delivers real-time visibility. It receives continuous telemetry streams from sFlow agents such as host-sflow and converts them into actionable metrics. These metrics can be accessed through the REST sFlow API.
- FastNemMon This flow analyzer tool is an excellent alternative to Host sFlow. FastNemMon is a high-performance DoS/DDoS detection and traffic monitoring. It is built on top of multiple packet capture engines, including sFlow, NetFlow, PCAP, and others.
- Prometheus An open-source monitoring solution that can collect massive numbers of metrics and aggregate them as time series data. Any sFlow-enabled device or a Host sFlow agent can be integrated with Prometheus to improve an environment’s visibility.
- Wireshark An open-source protocol analyzer that can be used with sFlow to capture and analyze traffic. It can be considered a sFlow analyzer (although it does more than sFlow). If you configured Host sFlow to send sFlow to the host where Wireshark is installed, you should be able to analyze sFlow packets.
- Grafana The sFlow agents using the host-sflow will generate sFlow telemetry data which can be pushed toward the Grafana server (sFlow collector). A Grafana agent must be integrated with a real-analytics engine like sFlow-RT. This agent queries the sFlow-RT API for metrics and pushes them into Grafana.